


How to Create 3D Secure Payments Using Recurly.js
Introduction
In this guide, we’ll walk through setting up 3D Secure payments using Recurly.js, covering both client-side and server-side configuration. We will do this using PHP.
Requirements
Before you begin, make sure you have the following:
- A Recurly account
- A Recurly Public API Key
- A Recurly Private API Key
- A Subscription Plan with a plan code
You can create a Recurly account here.
A Recurly account
A Recurly Public API Key

A Recurly Private API Key
A Subscription Plan with a plan code

Step 1: Install and Configure Recurly.js
Add Recurly.js to Your HTML
<script src="https://js.recurly.com/v4/recurly.js"></script>
Initialize Recurly
recurly.configure({
  publicKey: 'your-public-key-here'
});
Step 2: Setup the Payment Form with Hosted Fields
Recurly Hosted Fields securely collect card data while ensuring PCI compliance.
<form id="payment-form">
         <!-- Billing Details -->
         <input type="hidden" data-recurly="first_name" value="Ben" name="first_name">
         <input type="hidden" data-recurly="last_name" value="du Monde" name="last_name">
         <input type="hidden" data-recurly="address1" value="1313 Main St." name="address1">
         <input type="hidden" data-recurly="city" value="Hope" name="city">
         <input type="hidden" data-recurly="country" value="US" name="country">
         <input type="hidden" data-recurly="state" value="WA" name="state">
         <input type="hidden" data-recurly="postal_code" value="98552" name="postal_code">

         <!-- Recurly Card Element -->
         <div id="recurly-element-card"></div>

         <div id="payment-message" class="mt-2"></div>

         <div class="d-flex justify-content-center align-items-center">
           <button type="submit" id="subscribe" class="btn mt-2 btn-success">Subscribe</button>
         </div>

         <input type="hidden" id="recurly_token" name="recurly_token">
       </form>
Style Hosted Fields (Optional)
const elements = recurly.Elements();
    const cardElement = elements.CardElement({
      style: {
        fontFamily: 'Open Sans',
        fontSize: '1rem',
        fontWeight: 'bold',
        fontColor: '#2c0730'
      }
    });
Step 3: Tokenize the Card & Initiate 3D Secure
document.getElementById('payment-form').addEventListener('submit', function (event) {
  event.preventDefault();

  recurly.token(document.querySelector('#payment-form'), function (err, token) {
    if (err) {
      console.error('Tokenization error:', err);
    } else {
      initiate3DS(token);
    }
  });
});
Step 4: Handle 3D Secure Challenge
We need the following files for the payment process:
- index.php
- payment.php (AJAX file)
- The Recurly PHP SDK
index.php
<!DOCTYPE html>
<html lang="en">
<head>
  <meta name="viewport" content="width=device-width, initial-scale=1" />
  <title>Recurly.js Example: 3-D Secure</title>
  <script src="https://js.recurly.com/v4/recurly.js"></script>
  <script src="https://ajax.googleapis.com/ajax/libs/jquery/1.11.1/jquery.min.js"></script>

  <link href="https://fonts.googleapis.com/icon?family=Material+Icons" rel="stylesheet" />
  <link href="https://js.recurly.com/v4/recurly.css" rel="stylesheet" />
  <link href="https://fonts.googleapis.com/css?family=Open+Sans" rel="stylesheet" />
  <link href="/style.css" rel="stylesheet" />

  <!-- Bootstrap -->
  <link href="https://cdn.jsdelivr.net/npm/bootstrap@5.3.7/dist/css/bootstrap.min.css" rel="stylesheet">
  <script src="https://cdn.jsdelivr.net/npm/bootstrap@5.3.7/dist/js/bootstrap.bundle.min.js"></script>
</head>
<body>

  <div class="container p-5">
    <div class="row">
      <div class="col-sm-12 col-lg-6 offset-lg-3 col-md-6 offset-md-3">
        <form id="payment-form">
          <!-- Billing Details -->
          <input type="hidden" data-recurly="first_name" value="Ben" name="first_name">
          <input type="hidden" data-recurly="last_name" value="du Monde" name="last_name">
          <input type="hidden" data-recurly="address1" value="1313 Main St." name="address1">
          <input type="hidden" data-recurly="city" value="Hope" name="city">
          <input type="hidden" data-recurly="country" value="US" name="country">
          <input type="hidden" data-recurly="state" value="WA" name="state">
          <input type="hidden" data-recurly="postal_code" value="98552" name="postal_code">

          <!-- Recurly Card Element -->
          <div id="recurly-element-card"></div>

          <div id="payment-message" class="mt-2"></div>

          <div class="d-flex justify-content-center align-items-center">
            <button type="submit" id="subscribe" class="btn mt-2 btn-success">Subscribe</button>
          </div>

          <input type="hidden" id="recurly_token" name="recurly_token">
        </form>
      </div>
    </div>
  </div>

  <!-- 3D Secure Modal -->
  <div class="modal fade" id="recurlyBackdrop" data-bs-backdrop="static" data-bs-keyboard="false" tabindex="-1" aria-labelledby="recurlyBackdropLabel" aria-hidden="true">
    <div class="modal-dialog">
      <div class="modal-content">
        <div class="modal-body">
          <div id="my-auth-container" style="width: 450px;height: 450px;"></div>
        </div>
      </div>
    </div>
  </div>

  <script>
    recurly.configure({
      publicKey: 'your-public-key' // Replace with your actual public key
    });

    const elements = recurly.Elements();
    const cardElement = elements.CardElement({
      style: {
        fontFamily: 'Open Sans',
        fontSize: '1rem',
        fontWeight: 'bold',
        fontColor: '#2c0730'
      }
    });
    cardElement.attach('#recurly-element-card');

    $('#payment-form').on('submit', function(event) {
      event.preventDefault();

      $('#subscribe').prop('disabled', true).text('Processing...');
      $('#payment-message').html('');

      const form = this;
      const formData = new FormData(form);

      recurly.token(elements, form, function(err, token) {
        if (err) {
          $('#payment-message').html('<div class="alert alert-danger">' + err.message + '</div>');
          $('#subscribe').prop('disabled', false).text('Subscribe');
        } else {

           formData.append('recurly_token', token.id);

          $.ajax({
            url: 'payment.php',
            method: 'POST',
            data: formData,
            dataType: 'json',
            processData: false,
            contentType: false,
            success: function(response) {
              if (response.status === true) {
                $('#payment-message').html('<div class="alert alert-success">Payment successful!</div>');
                $('#subscribe').prop('disabled', false).text('Subscribe');
              } else if (response.status === false && response.threeDSToken) {
                $('#recurlyBackdrop').modal('show');
                handle3DSecureAuthentication(response.threeDSToken);
              } else {
                $('#payment-message').html('<div class="alert alert-danger">Payment failed.</div>');
                $('#subscribe').prop('disabled', false).text('Subscribe');
              }
            },
            error: function() {
              $('#payment-message').html('<div class="alert alert-danger">Server error during payment.</div>');
              $('#subscribe').prop('disabled', false).text('Subscribe');
            }
          });
        }
      });
    });

    function handle3DSecureAuthentication(threeDSToken) {
      const risk = recurly.Risk();
      const threeDSecure = risk.ThreeDSecure({
        actionTokenId: threeDSToken
      });

      threeDSecure.on('token', function(token) {
        $('#recurlyBackdrop').modal('hide');

        // Send 3DS result token to backend
        $('#payment-message').html('<div class="alert alert-success">3D Secure authentication complete.</div>');

           $('#subscribe').prop('disabled', false).text('Subscribe');
           $('#payment-message').html('');

           // You can add here success payment code
      });

      threeDSecure.on('error', function(error) {
        $('#payment-message').html('<div class="alert alert-danger">3DS Error: ' + error.message + '</div>');
        $('#subscribe').prop('disabled', false).text('Subscribe');
      });

      $('#my-auth-container').html('');
      threeDSecure.attach(document.querySelector('#my-auth-container'));
    }
  </script>
</body>
</html>
Install the Recurly PHP SDK
composer require recurly/recurly-client
payment.php (AJAX file)
<?php
// Autoload the Recurly SDK
require 'vendor/autoload.php';

use Recurly\Client;
use Recurly\RecurlyError;

$apiKey = 'recurly-private-api-key';  // Replace with your actual Recurly API key
$client = new Client($apiKey);

// Check if the Recurly token is present
if (!isset($_POST['recurly_token']) || empty($_POST['recurly_token'])) {
    die("Error: Missing Recurly token.");
}

// Retrieve the token and generate a dynamic account code
$paymentToken = $_POST['recurly_token'];  // Get the token from the form
$accountCode = date('YmdHis') . '-test';  // Use the dynamic account code

// Prepare the purchase creation array
$purchase_create = [
    "currency" => 'INR',
    "account" => [
        "code" => $accountCode,
        "first_name" => $_POST['first_name'],
        "last_name" => $_POST['last_name'],
        "email" => 'example@gmail.com',  // Replace with dynamic email
        "billing_info" => [
            "token_id" => $paymentToken,  // Pass the Recurly token
        ],
    ],
    "subscriptions" => [
        [
            "plan_code" => "110586",  // Replace with your plan code
            "unit_amount" => 500,  // Price in cents (500 INR)
            "quantity" => "1",  // Number of items
        ]
    ]
];

try {
    // Create the purchase
    $invoice_collection = $client->createPurchase($purchase_create);

    // Get the transaction error
    $transaction_error = $invoice_collection->getChargeInvoice()->getTransactions()[0]->getTransactionError();

} catch (\Recurly\Errors\Validation $e) {
    // Handle validation errors
    $response = array(
        'status' => false,
        'message' => $e->getMessage(),
    );
    echo json_encode($response);

} catch (\Recurly\RecurlyError $e) {
    // Handle Recurly API errors (e.g., 3D Secure)
    $three_d_secure_action_token_id = $e->getApiError()->getTransactionError()->getThreeDSecureActionTokenId();

    $response = array(
        'status' => false,
        'message' => $e->getMessage(),
        'threeDSToken' => $three_d_secure_action_token_id,  // Send 3DS token if needed
    );
    echo json_encode($response);
}
?>
Final Steps
When you follow the steps above, you will see a screen like the one shown.
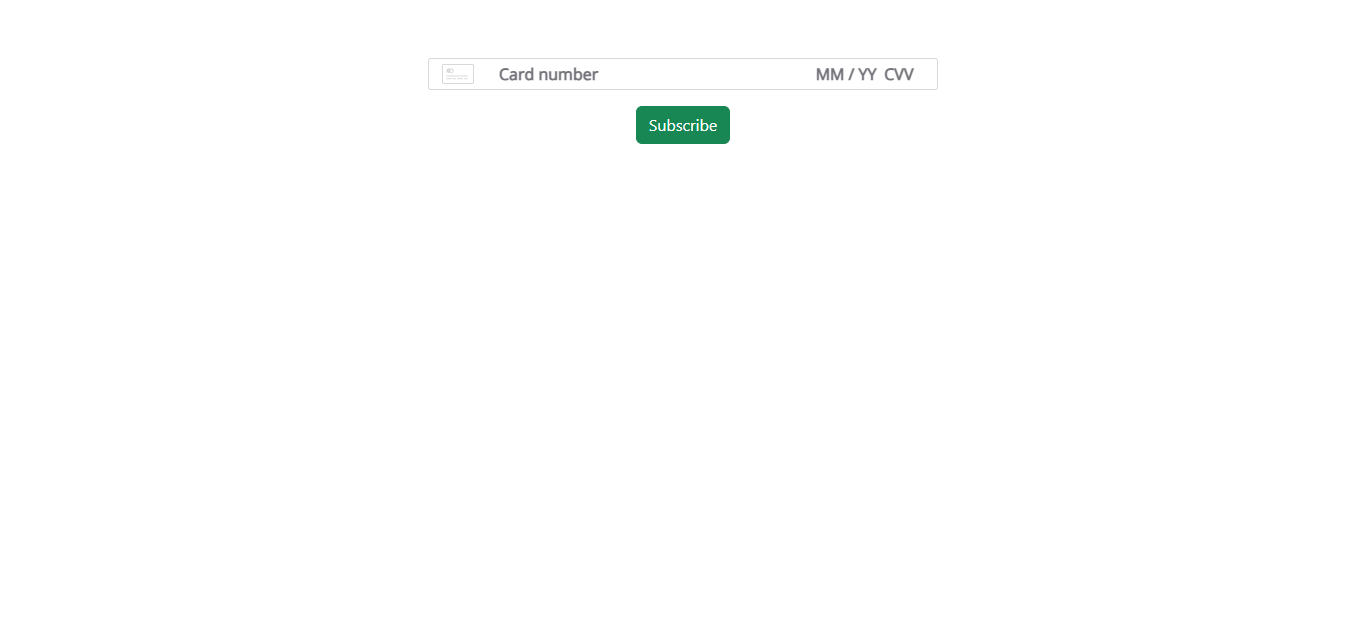
Enter a test payment card number and use a future expiration date in the form.
| Card Number | Behavior |
|---|---|
4000000000003220 |
Challenge flow |
4000000000003063 |
Device fingerprint flow |
4222222222222220 |
Approved fraud review (frictionless flow) |
4000008400001629 |
3DS2 challenge for any recurring transaction (e.g., dunning) |
Once submitted, a 3D Secure popup will appear, allowing you to complete the authentication.

This completes the Recurly 3D Secure payment integration process.
Conclusion
You’ve now set up a fully functional 3D Secure payment flow using Recurly.js! This ensures your payment processing is secure, compliant, and optimized for user trust. By leveraging Recurly’s built-in tools, you’ve simplified what would otherwise be a very complex integration.
If you have any questions or need assistance, feel free to contact me.
I’ll be available to help you as soon as possible.
Thank you!